
SSH keys provide a secure way of logging into a remote server without the need for a password. If you’re using GitHub, creating an SSH keygen on your Mac allows you to securely connect to your repositories without entering your credentials each time. This guide will walk you through the process of generating an SSH keygen and configuring it with GitHub.
Step-by-Step to Generate an SSH Key GitHub
Step 1: Open Terminal
To begin, you’ll need to open the Terminal on your Mac. You can find Terminal in Applications » Utilities » Terminal, or you can search for it using Spotlight by pressing Command + Space and typing “Terminal.”
Step 2: Generate a New SSH Key
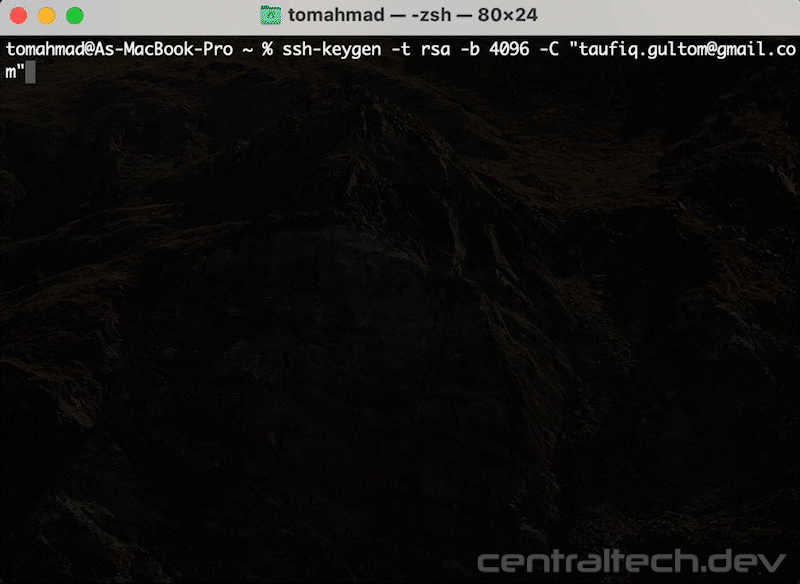
In the Terminal, enter the following command to generate a new SSH key:
ssh-keygen -t rsa -b 4096 -C "your_email@example.com"Here’s what each part of this command means:
- ssh-keygen: This is the command that generates a new SSH key.
- -t rsa: Specifies the type of key to create, in this case, an RSA key.
- -b 4096: Sets the number of bits in the key to 4096. A higher bit value means a more secure key.
- -C “your_email@example.com”: Adds a label to the key, typically your email address, to help identify it.
After entering this command, you will be prompted to save the key:
- Save Location: Press
Enterto accept the default location (/Users/your_username/.ssh/id_rsa). - Passphrase: You will be asked to enter a passphrase for additional security. You can choose to leave it empty by pressing
Enter, but setting a passphrase is recommended.
Step 3: Add the SSH Key to the SSH-Agent
To manage your SSH keys, you’ll need to add the newly generated SSH key to the SSH agent. Run the following command in Terminal:
ssh-add ~/.ssh/id_rsaThis command loads your SSH private key into the SSH agent, making it available for authentication.
Step 4: Copy the SSH Key to Your Clipboard
Next, you need to copy the SSH public key to your clipboard so you can add it to GitHub:
pbcopy < ~/.ssh/id_rsa.pubThis command copies the contents of your public key file (id_rsa.pub) to the clipboard.

Step 5: Add Your SSH Key to GitHub
Choose one of the following two methods :
Method 1 : SSH and GPG Keys (Account-wide SSH Keys)
Use Account-wide SSH Keys if you are a developer who needs to work on multiple repositories and prefers the convenience of managing a single key. This method is ideal for users who need broad access across their GitHub account.
- Go to your GitHub account settings.
- And under “SSH and GPG keys,” click New SSH Key.
- Give your key a descriptive title (e.g., “Personal Laptop Key”) and paste the SSH key from your clipboard into the key field, then click Add SSH Key.
- Done

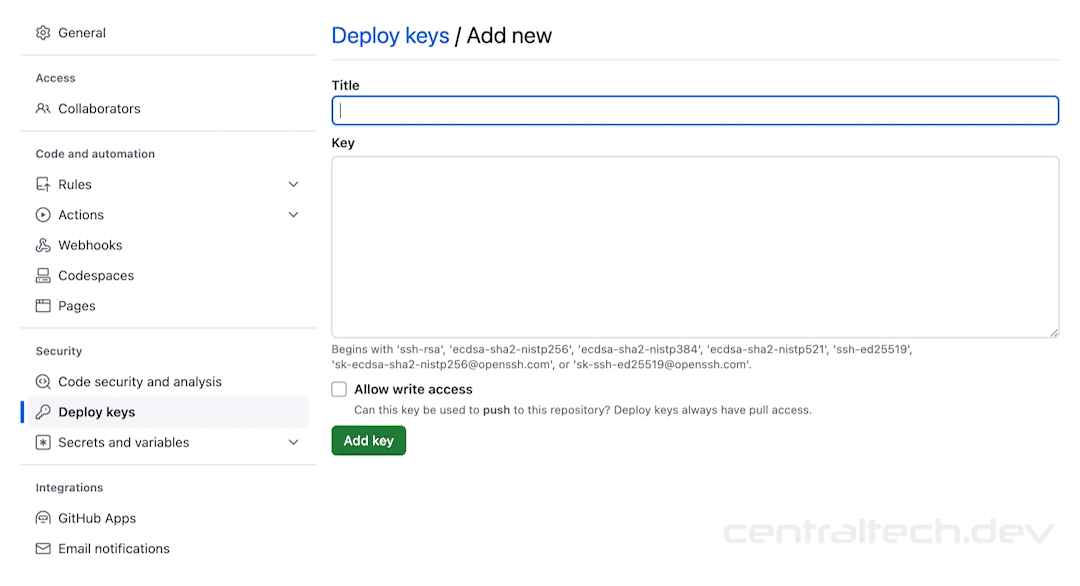
Method 2 : Deploy Keys (Repository-specific SSH Keys)
Use Deploy Keys if you need to grant access to a specific repository, particularly for automation tools, CI/CD systems, or when you’re working in an environment that requires strict access control. Deploy keys provide a secure, repository-specific access method that minimizes the risk of overprivileged access
Now that your SSH key is copied to your clipboard, you can add it to your GitHub account:
- Log in to GitHub : Visit GitHub and log in to your account.
- Navigate to Deploy Keys : Open your Repository and go to Settings. In the left sidebar, click Deploy keys.
- Add Deploy Key : Click the Add deploy key button.
- Paste Your Key : In the “Title” field, enter a name to identify this key (e.g., “MyKey”), and paste the SSH key you copied in Step 4 into the “Key” field.
- Don’t forget to tick ‘Allow write access‘.
- Save : Click Add key to save your new SSH key.
Here, for more detail about the Differences Between SSH Key Storage Methods on GitHub: SSH and GPG Keys vs. Deploy Keys.
Step 6: Test the SSH Connection
Finally, you should test your SSH connection to ensure everything is set up correctly. Run the following command in Terminal:
ssh -T git@github.comIf this is your first time connecting, you may see a message asking if you want to continue connecting. Type yes and press Enter.
If your setup is correct, you should see a message like this:
Hi your_username! You've successfully authenticated, but GitHub does not provide shell access.This message confirms that your SSH key is working correctly and you can now interact with GitHub repositories securely.

Conclusion
Creating an SSH keygen on macOS is a straightforward process that significantly enhances the security and convenience of your GitHub interactions. By following the steps outlined in this guide, you can generate a secure SSH key, add it to GitHub, and verify the connection—all within a few minutes.
Remember, using SSH keys is a best practice for secure access to remote servers and services like GitHub. Keep your private key safe, and enjoy the hassle-free authentication that SSH keys provide!
Leave a Reply